Monday, March 23, 2015

3d Print Quality - A Closer Look (some new things including my 53' reefer)

I just got a new package from Shapeways today and thought I would share some close up photos of some of my latest designs.  After a soak in Bestine, I rinsed the pieces off with warm water and while they were drying, I took some photos.  Keep in mind that some of the parts are still damp, which tends to leave them with a more transparent appearance.

This 389 Peterbilt isn't a new design, but I did enhance some things.  In addition, I have added a set of mudflaps as part of the grill and air cleaner sprue.  They have a bracket already designed in, with a mounting pin that fits into a hole already designed into the frame.  I am anxious to assemble one of these to see how they turn out.


My concrete block layered sandwich pieces turned out as expected.  The detail is great.


This isn't my first 53' reefer print, but the first I am sharing.  I tweaked the design slightly from the original, but the components are still pretty much the same.  I wanted to show a close up of the rear door, as the detail is very clean.  I have already assembled one of these trailers and they are a beautiful trailer.  With no one else in the world making a modern reefer, I'm excited to be the first to do so.  We desperately need them.


Saturday, March 21, 2015

Custom Peterbilt 389. It's Getting Good.... Really Good

I was anxious to get this beauty finished, so I rushed some of the details before letting them dry completely.  However, I think it turned out really well.  Surprisingly, this is my first Pete 389 that I have painted, and one of the latest models I have designed to date.  This custom version includes the stretched frame, rear fenders, and custom taillight bar with shorty mud flaps.

The paint is Rustoleum from a spray can which seem to give me great results on these trucks, and very easy to use without a lot of clean up.  I included a photo of the Peterbilt 386, 379, and 389 side by side to illustrate the subtle differences in these models.  

Lastly, I am still perfecting my 53' reefer design, but thought I would include a teaser at the bottom of the page here.  


Saturday, March 14, 2015

Concrete Block on Pallet - Loads for Flatbed Trailers

I had an idea proposed to me the other day, so I decided to make a new design.  I have been thinking about suitable loads for my flatbed trailers, and pallets of concrete blocks is a perfect fit.  I probably over-engineered the design, but I don't want the stack of blocks to look like one giant block once printed.  So I decided to design individual tiers that could be printed and then stacked separately, including the pallet.

You can see here that I designed a pallet, top and bottom tier, and then 4 middle tiers that can be turned a quarter turn when stacked to "tie" them into the other tiers.  I voided the middles to reduce print material.  I also created a render of what the load will look like after assembly.


Saturday, March 7, 2015

Peterbilt 386 Out of the Paint Shop & My Growing Class 8 Fleet

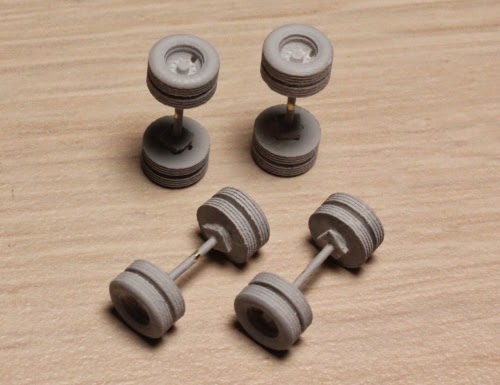
My first Peterbilt 386 is fresh out of the paint shop.  I decided to go yellow on this truck.  The exhaust stacks are brass wire and aluminum tubing for the mufflers.  The mirrors are brass wire for the brackets and styrene for the mirrors.  The steps and fuel tanks were wrapped with aluminum HVAC tape.  Overall I am pleased with how this model turned out.  The newer front axle design makes assembly so much easier.  Instead of trimming the axle and eyeballing each wheel for proper location, now I simply twist the wheel on until it bottoms out against the larger diameter shoulder.  The custom made mirrors were also easy to apply with the #80 holes already printed into the cab.  With these enhancements, I hope to be able to cut down on my time to finish a model, and increase the overall quality of the final product.

While it seems that I have finished only a small number of models, I am beginning to accumulate a sizable fleet.  I now have a decent collection of class 8 trucks, with more planned.  I hope to have a 389 to add to the fleet soon.  Stay tuned.


Painting Wheels

I have tried a few different methods of painting my wheels, and wanted to share my experiences and the method that I feel gives the best results, and the least amount of work or steps to complete.  When I first started these 3d projects, I tried painting my wheels before assembling to the truck frame, after assembling to the truck frame, painting black first and then silver for the wheel, painting silver first and then black for the tire, primer first and then color, and no primer and painting color only.

What I have found is that primer works very well on the truck body and cab, but will just build up on the details on the wheels.  So for my aluminum wheels, I use a rustoleum spray can and paint a couple of coats directly on the raw print.  For steel rims, I still use primer, and then hand paint the rims whatever color I want.

What about timing of tires and wheels?  Well, I find that painting silver first, and then hand painting the tire black yields the best results.  I have designed the front tires with an exaggerated rim where it meets the tire so that a steady hand with paint brush can flow the paint right up to the rim and leave a nice crisp line between tire and wheel.  The rear wheels are a little easier in that I just use a silver Sharpie marker around the inside of the rim to make a perfect line between rim and tire.

As I have posted before, my recent design revisions to place the wheels in a square pattern on the sprue rather than a straight line has seemed to influence the print orientation.  I am getting my wheels printed flat now, which results in very clean prints.  As you can see in the photos, the lug nut detail is present on all wheels.  Take a look at my Kenworth T2000 and you will see that the quality of my wheels has come a long way from the early days.


Sunday, March 1, 2015

Some Progress on My Kenworth T2000 and Fontaine Drop Deck Trailer

I thought I would share some progress I am making on a couple of models.  First, the Fontaine drop deck trailer is not new, but I never got around to finishing one for myself.  This trailer model is the Fontaine Infinity which has a steel frame.  I decided to paint the frame red to make it pop a bit.  The trailer still needs a few details including DOT stripes, and maybe some toolboxes between the spread axles.  Also note that this model has the appropriately sized lo-pro tires, just like the real one.  I am already starting to think of dozens of load types to put on this thing.

My Kenworth T2000 is a new model, and this is the first of my truck designs with included mirror details.  The mirrors come printed on a sprue which includes the wheels and tires.  They have a small post on the end of the mirror bracket which fits into a hole on the side of the cab, which is also designed and printed into the model.  I am surprised how much difference a small detail like this adds to the overall truck model.  You will also notice how much cleaner the wheels and tires are in both printed detail and paint.  Re-configuring the wheels in a square pattern versus in a long straight line seems to have influenced how Shapeways is printing these parts.  So far, my wheels are getting printed flat, and very clean.  This is now producing some fantastic results.