Showing posts with label Rolling Stock. Show all posts

Sunday, October 28, 2012

My First Centerbeam Weathering Victim is Finished

I have collected a fair number of Red Caboose 73' centerbeam flatcars over the past several months, as part of my lumber load explosion.  The first weathering victim is a Burlington Northern version still sporting green paint which I had started several months ago.  Much like the 86' boxcars that I just recently completed, this BN centerbeam project was also gathering dust on my workbench.

Here it is, the first of many centerbeam weathering projects that I hope to complete.  This was a challenging piece of rollingstock due to the various surfaces that required a lot of time and attention to detail.  I started with a fade coat of my raw umber tint, and then spent a couple hours adding the rust with a small brush and oils.  A make-up sponge came in handy to smudge and blend the oil on the larger surfaces.  I added reflector stripes and a final coat of dullcoat to seal things off.


Here's the centerbeam with a partial load of Sierra Pacific lumber.  I made these bundles earlier this year to be used in a loading/unloading scene on a future layout or diorama perhaps.  I think they look quite nice.


Saturday, October 27, 2012

CSX & NS Big Ugly's Completed

A couple other weathering projects that I had started awhile ago and just now completed are two 86' boxcars made by Trainworx.  These are both the 8 door version, in both CSX and NS.

I scaled back the weathering on these compared to the other 86 footers that I completed earlier.

The NS version got a fade coat using the raw umber tinted mix.  This toned down the white areas on the body, and gave it a slight yellowish look.  If you recall my attempts at weathering a Southern Pacific 86' boxcar, the brown and red factory paint requires some tinting with other colors to the white fade coat to achieve the appropriate color.


The CSX version received a fade coat using just the transparent white.  I then followed with burnt sienna and burnt umber oils on the body and roof.  I used a stripe pattern on the roof based on some prototype photos I have seen.  This adds some nice variety to the rust patterns on my entire fleet of boxes.


Here is a shot of all 3 big ugly's that I finished lately.


Canadian National Big Ugly - Ready for Service

It has been a very long time since I posted something worthwhile on the topic of weathering.  After a few months of distractions, I have been able to focus on some model railroading.  The past couple of evenings I completed a few weathering projects that were started months ago, and have been sitting on my workbench.  

Here is a Bluford Shops 86' boxcar in Canadian National colors.  I took the weathering a bit farther than I had originally intended, but I like the way it turned out.  Much better than the out-of-the-box baby blue paint.


Here are a couple photos that I posted a few months ago, after the fade coat, some graffiti decals, and the initial burnt umber oil on the sides of the car.


Here is a Grand Trunk version of an 86' box that I found in Ft. Worth, Texas earlier this year.  I wasn't necessarily using this particular photo as my guide for the N scale CNA, but it provided some prototype inspiration.  This is a 4 door model, and a different builder than the Bluford Shops version.


Tuesday, September 4, 2012

Weathering - Back in the Saddle (sort of)

My model railroading activity has been almost non-existent lately.  I did however get a few packages in the mail recently that have sparked my interest.  That, and a mild forecast for the next several days and perhaps longer is motivating me to get back into my hobby.  My fascination with the 86' big ugly's has led me to collecting other hi-cube boxcars.

LBF made a nice 60' version which is long gone now in N scale, but you can still find them on ebay.  I weathered a TTX and a BNSF several months ago, and found a set of 5 more painted for NS.  I have the trucks off of them and will be fading them soon I hope.  They didn't cost a lot and will add variation to my manifest trains.  I also found a few shorter LBF 50' hi-cube boxcars in CNW paint and CHTT.  I found these brand new online.  The cost again was appealing, and they come with Micro Trains trucks which is worth a lot just by themselves.

I picked up a half dozen Exactrail hi-cube cars as well.  First, I found a CN version which has been sold out for some time now, and was a great find in my opinion.  The rest of the batch were all TTX, and the latest run by Exactrail.  I was pleasantly surprised to see the model has been upgraded to body mounted couplers.

Lastly, I picked up a BN 86' box which I plan to destroy with fading, graffiti, and lots of rust.  I also bought several more sets of Blair Line graffiti decals (not pictured).  I found I like these better than the MicroScale graffiti decals.  

So overall, not a lot to brag about as far as actual modeling progress, but lots of goodies to add to my already overweight project collection.  Hopefully I'll get around to working a few of these models in the upcoming days.


Here is a comparison shot of an original run and a current run Exactrail 50' TTX hi-cube.  The car hasn't changed much, but a nice improvement is the body-mounted couplers.  The paint and lettering seem to be a bit more crisp, which was about perfect anyway.


Monday, June 18, 2012

CNA 86' Boxcar - Progress Photos

I thought I would share some progress photos of a Bluford Shops model 86' boxcar painted in CNA blue.  I want to replicate a fair amount of age, grime, and rust on this version.  I started with a white fade, and sprayed several coats over the bright blue.  I followed the white with a couple coats of the raw sienna tint.  The graffiti decal went on next.  To achieve the surface rust appearance much like the CSX version I did recently, I brushed on a coat of burnt umber oil thinned with mineral spirits.  I let this sit for a short time, and then took most of it off using a cosmetic sponge.  A note here: I have tried the q-tip method for taking off excess oil, but with these larger bodied cars, the sponge seemed to work very effectively, and faster than a q-tip.  The oil builds up around the ribs and in the details of the doors which is exactly what I want.  At this point, the roof hasn't been touched.  You can see the original color in the photos.  In order to get additional grime on the doors, I then added more burnt umber with a brush, but this time more deliberately, and just on the doors.  I again took off the excess with a sponge, and in a few areas with a q-tip.  Lastly, I began working on the roof by adding a layer of burnt sienna oil which you can see on the cardboard pallet in photo 2.  This will be the base coat which I will then apply burnt umber using a dabbing motion with a stiff brush to achieve a well rusted roof top.  The body will get rust streaks, spots, and details, using more burnt umber and a small brush.  I plan to add some more graffiti towards the end, in addition to safety striping.  Any questions?

In this first photo you can see that I have added a bit more burnt umber oil to the right set of doors.  The left set of doors are the result of a single coat of burnt umber applied to the entire car, and then taken off with a cosmetic sponge.  (just like when you are applying your morning make up fella's)


I use a piece of cardboard as a pallet for my oil paints.  The roof was painted with oil straight from the tube.


Here is where the car stands as of this evening when I decided to stop.  I'll pick it up again tomorrow evening after the oils have dried.


Tuesday, June 12, 2012

CSX & NS (SOU) 86' "Big Ugly" Progress

First, I apologize for all of the unfinished weathering projects I have been sharing lately.  I have a lot of projects in motion, and just need to put the final touches on many of them and put them back into service.  However, I guess it is also beneficial to show some of these weathering victims as they evolve so that I can illustrate the methods I am using for each.  I spent the last few evenings working on a pair of Trainworx 86' boxcars in a CSX blue scheme and NS (SOU reporting marks) scheme.

The CSX version got the "works".  I started with a white fade, then a raw sienna fade, then yellowish/white chalks, sealed, then yellowish/rust chalks, then oil for the roof and streaks.  That seems like a lot of steps, but once the airbrush is out, it goes quick.  The two layers of chalk followed by a seal coat were quick as well.  The oil is still a bit wet in this shot, so it appears shiny.  I will add some safety stripes, and maybe some more detail and this will be ready for a pair of trucks.


The NS received a white fade, then a raw sienna fade, then graffiti and safety stripes.  The first photo is the side yet to receive safety striping.  I also masked off a small rectangle to replicate a repair that had been painted with primer, which is much brighter than the original faded paint.  You can see it under the left graffiti tag.  I don't know what I plan to do with the roof yet, however, this car is a bit cleaner than the rest and will only get a light rust treatment if any.


Here are the original cars before any weathering.  I really enjoy comparing a before and after, especially the darker cars like the CSX version.


Thursday, June 7, 2012

NS 86' Box "Thoroughbred" Progress

I started on two more 86' boxcars tonight.  I had pictured them here a couple weeks ago.  I have a CSXT in the 8 door version, and a NS (SOU markings) in the 8 door version as well.  Both of these cars are dark in color, but well faded in reality, so my fade method and tint mixtures are going to get tested, which is good since I need more practice.  I am nearing completion of the grey NS boxcar that I began awhile back.  I used a heavy dose of chalk on this to bring out the rib detail on this light colored car.  I have since added graffiti and yellow safety striping.  It needs a bit more detail work, and a set of weathered trucks and it will be ready for service.

I will share my progress on the CSXT and SOU versions soon.  I have been shopping for some additional "big ugly's" to add to my collection, as I just can't get enough of these.

One note about the NS thoroughbred version.  This is a Bluford N scale model, which is a Pullman Standard design.  Trainworx makes a different version of the 86' boxcar which follows the Thrall design.  I couldn't find a PS prototype photo with the grey NS paint scheme, only a Thrall version.  So it appears that Bluford took some liberty when adding this to their offering.  Through out my limited research of 86' boxcars in general, it appears that both Bluford and Trainworx added some paint schemes to their offerings that don't actually exist on that specific builder's car.  While this isn't a show stopper for me, I also like to find prototype examples of rollingstock that I weather, so that I can at least replicate the general age, condition, and appearance of the item in a current day fashion.

I will say that I have really enjoyed collecting both versions of 86' boxcars, and plan to add more as time permits.

My weathering steps are as follows:
  • Fade with white tinted mixture
  • Black and dark grey chalk on body
  • Sealed with Microflat (I find that when I airbrush dullcoat over chalk, it leaves a white haze on the model.  Perhaps it is going on either too dry or too heavy.  Dullcoat works well over oils and non-chalk applications, in my experience.)
  • Burnt Sienna oil on roof and body (replicate newer/brighter surface rust)
  • Brush black acrylic around door hinges and detail to replicate grease and grime
  • Graffiti and stripe decals
  • Seal with dullcoat


Wednesday, June 6, 2012

RTTX Flatcar - Weathering Challenge

My latest weathering challenge, besides the 86' boxcars that I have been doing, has been a new BLMA flatcar.  I posted a few weeks back about these after I had just received a set of 6, and they are very fine models.  Of course, it doesn't take long after studying the prototype that these cars are well used, grimed, and rusted.  I have been working on a single car the past several days, and finally put the finishing touches on it tonight.  This was a difficult car to weather since it has a lot of detail.  An airbrush simply can't get into corners and around detail, without putting too much paint on the higher surfaces, so instead, I tried oils and a paint brush.  It took a few layers of oils to reach the amount of grime I was seeking.  I then used a q-tip to take off any excess where appropriate.  This car has taken me several partial working sessions, but I think the effort paid off.  The last bit of oil applied tonight is still a bit wet, but I snapped a few photos anyway.  I'll apply a light dullcoat in the next couple of days, and this flatcar will be ready for service.  I have several 28' pup trailers that are waiting for a weathering application as well, and once complete, will make a fine load for this flatcar.

Overall, with the amount of effort that this has taken, I am glad I only have 6 to complete, especially when you add the effort needed to add weathered trailers.  I may look at other methods to dirty up highly detailed cars such as this.  I do have a few sets of BLMA spine cars as well, and also looking for an effective means to weathering those.  I would be interested to hear from anyone that has some suggestions or examples for these types of rollingstock.

Thank you BLMA for adding yet another fine N scale model to my addiction, I mean collection.


Friday, May 25, 2012

Eastern "Big Ugly's" My Next Weathering Victims

I'm an equal opportunity model railroader, and believe that all rollingstock no matter what age, color, condition, etc. can find a place in my fleet.  Even those "eastern" roads are interesting models, and add a lot of character to a train when mixed in with BNSF and UP equipment.  I have a nice selection of CSX and NS 86' boxcars that I chose for my next weathering victims.  Here I have started on a unique and rare grey NS version.  It received a fade coat followed by chalks.  I used burnt sienna oil on the roof.  It will get some graffiti, reflector stripes, and maybe a dusting around the bottom of the car with an airbrush to finish it off.


Wednesday, May 23, 2012

SP "Big Ugly" Weathering Project - Revisited

I started weathering a Southern Pacific 86' boxcar, and got as far as the fade coat several weeks ago.  At the time I was experimenting with different colored or "tinted" fade mixtures.  This particular car got a white fade followed by a raw sienna tinted mixture.  It turned out quite yellow, but I wasn't concerned as I wasn't finished with layering other weathering on top.  A few days ago I revisited this car in order to finish it and put it into service on the layout.  I added a layer of burnt umber oil thinned with a bit of mineral spirits applied with a brush to the entire car.  I then wiped most of it off with a q-tip.  This left the car with a nice stain, as well as some build up in the details, especially around the doors.  I then added burnt sienna and umber to the roof in a couple different applications until I had the effect I was working towards.  Lastly, I used a fine brush to add rust patches and scratches on the side of the car.  I am not finished yet, but getting very close.  I still need to add reflector stripes, and perhaps a little graffiti.  

I have 2 of these SP version Trainworx cars, and was quite surprised when I did a side by side comparison of the out-of-the-box model and my weathered version.


Saturday, May 5, 2012

Added an AGPX Grain Hopper to my Weathered Fleet

I have a decent collection of grain hoppers that I picked up over the years, especially when Intermountain began releasing models with etched walkways and MicroTrains trucks and couplers.  I chose an AGP model as a weathering victim, and I think it turned out quite nice.  This is a green car, so I used a combination of my white fade and raw sienna fade to achieve the fading step.  Next I went straight to brushing on burnt umber oil paint.  Lastly, I added some graffiti and safety striping.  The trucks received a coat of Polly S rust + grimy black with an airbrush, and then a light dusting of rust colored chalk, sealed with dullcoat.  Wheelsets are Fox Valley Models.  I added a "before" shot below for comparison.


RTTX F89-J Flatcar by BLMA - Wow!

Just a brief post tonight featuring a new model that I recently received.  BLMA delivered their 89' flatcars, and I must say that I am really impressed.  I haven't operated them yet, but did install 3 hitches to the deck of one car.  I set three of my 28' pup trailers on it tonight to see how it looked.  The kingpins on the trailers are large, so I either need to remove some material, or drill out the hitches.  I bought all 6 numbers, and plan to operate them with a few sets of spine cars.  I'll do a more in-depth review of these in the future.  I can't wait to get them dirty!


Thursday, May 3, 2012

My Fleet of "Big Ugly's" - Trainworx and Bluford 86' Boxes

Like any addict, once I latch on to something new, I can't get enough.  I recently acquired 5 more "Big Ugly's", and have 1 more on the way.  You might be wondering why I am loading up on Union Pacific and related rolling stock.  The truth is, I like BNSF equipment, but my next layout will most likely be a location on the UP.  My plan is to thin my BNSF collection, but keep enough interesting pieces for run through only.

Anyway, I have what seems to be about 50 weathering projects on my work bench right now, and I feel like I am overdosing on N scale rolling stock lately.  All of my 86' selections have been Trainworx boxes so far, but I added a Bluford Shops model to the mix for comparison.  I really like both models, and plan to use a decent mix of both going forward.  I added some photos tonight since I haven't posted anything recently.

Here is a UP 86' box that has been faded and sealed with dullcoat.  It just needs trucks and it will be ready for service.  I set it in front of a couple new out-of-the-box models for comparison.  Even a very subtle fade makes a huge difference.

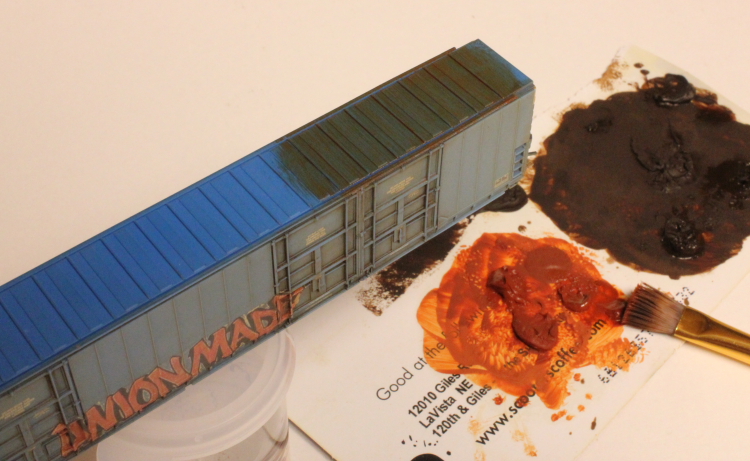
I think I am about finished with this Big Ugly.  I added some graffiti, and a few more rust spots on the body. Overall I like the results, and it will look great in a string of 86's with varying levels of weathering.

Here are the 5 new Big Ugly's, waiting for their weathering treatment.  The Canadian box is the Bluford Shops model.  Looks pretty "eh"?

I really like the coupler box on the Bluford Shops version, but it droops pretty bad.  I think I am going to remedy this by gluing the coupler box to the underside of the car.

The coupler pocket is made for tight radius curves, and allows for additional lateral movement.  However, this results in a drooping coupler.

If you are wondering about a body mounted coupler on an 86' boxcar, you are not alone, as I was concerned that it wouldn't handle curves well at all.  However, I am quite surprised.  Here is an 86' box with a body mounted coupler, connected to a 50' boxcar.  It doesn't seem to be pushed to the limit at all.

Here is what the Big Ugly looks like on a 15" radius curve.  There is a fair amount of overhang, but it operates well.

Another close up of the couplers on a 15" curve.  The coupler has much more room to move before it is prone to derailment.