Pages

Thursday, November 29, 2012

N Scale Model Railroad Best Practices - Benchwork

I have been thinking about a new layout for some time now, and am beginning to formalize some ideas and putting them on paper.  It's hard to believe that it has been about a decade since I started my first true N scale layout that I was able to complete.  I don't even have photos of the construction progress since I bought my first digital camera about the time the layout was finished.  Wow have times changed!  Since then, I think I have taken several thousand photos of my hobby, and have a digital camera that will take high definition video too.  As I continue to pursue the next layout plan and design, I thought it would be interesting to consider some of the best practices that I have adopted over the years, and document them here on my blog.  So here is an attempt to share years of experience in a few photos and text.

I thought I would start with benchwork, since that is where the 3 dimensional idea that is in my head actually begins to take shape.  I wrote a fairly comprehensive article about plywood benchwork in my Marias Pass series, so I won't go into that detail here.  This is more of an overview of my experience building benchwork, and several examples.

Benchwork Best Practices:

I have used plywood framing for my last two layout structures, and will probably never use anything else.  I simply can't accept the warped junk that is found at home improvement stores.  Sure you can buy premium lumber, but it is overpriced and too pretty to be hidden by a fascia board.  Instead, I buy 3/4" birch or oak veneer plywood, rip it into boards, and make my own lumber.  Sure you needs tools to accomplish this, but I  happen to be a handy guy, so the tools have more than paid for themselves.

Even though the framing material has changed over the years, the one common thread throughout is the fascia.  I continue to use 1/8" masonite for my fascia.  It is a great material that cuts easy, bends around modest curves, and provides a very professionally looking edge.

I use a long piece of masonite as a fence for my ripsaw.  A steady hand will make perfectly square boards.  Once I have a stack of lumber, I then turn to my miter saw to cut the pieces to length.


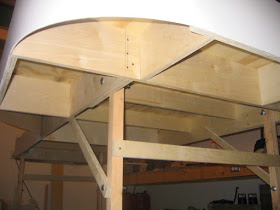
Here is the benchwork for the Marias Pass layout.  The width of the boards for the open frame are a true 6", and probably overkill, but I like solid benchwork.  Also, this layout is portable, so needs to resist twisting while being carried and loaded.


Here is a two section frame that I built for a total of 14'.  This was intended to become a BNSF Orin Line layout, but instead it was sold to a friend that designed it into a desert themed layout.  You can see the 2" foam in the background that was used for the track surface.  The frame sections and leg assemblies are all built using plywood.


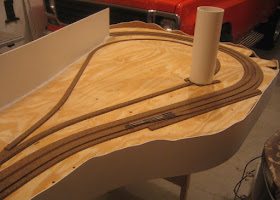
Here is layout #1 on its side for a photo.  I used regular pine lumber with a plywood cookie cutter subroadbed.


The Rocky Mt. Sub had a similar frame design to my first layout.  Again using standard pine 1x4's, I built an open grid frame with a plywood cookie cutter subroadbed.


 My BNSF Orin Line was the first layout to use plywood for the frame.  I am picky when it comes to building materials, and wanted a very straight and sturdy structure since I was going with a 4' x 10' footprint. a sheet of 1/2" plywood was used for the top, in order to provide a rigid surface for track and scenery.


 Here is a layout benchwork that I helped a friend build several years ago.  The design is nearly identical to the 5'x7' Rio Grande layout that Mike Danneman built.  It also used standard pine 1x4's with a plywood cookie cutter subroadbed.


Wednesday, November 28, 2012

N Scale Pallets - What a Great Find

I have been interested in finding some details to go with my GHQ forklift kits, and did some searching for a nice N scale pallet.  I found a source from pawofabear.com and based on the photos decided that their model appeared to be the most accurate replica, and bought a couple of kits.  The kit comes with enough material to make 45 pallets, or 90 skids, in 3 different sizes (15 of each pallet or 30 of each skid).  The instructions are well written and easy to follow, and I was able to make a set of pallets in a short time.  I used a straight razor blade to do the cutting which worked well for me.  What I like most about this model is that it is a true replica of a pallet, with top and lower decking, and the 3 stringers tying them together.  Although it does take a steady hand and some time to assemble them, they look much better than a one piece version or molding, in my opinion.  If you are looking for a great n scale pallet, check these out, I don't think you will be disappointed.

As far as my forklift project goes, I still have some work before they are complete.  Now that I have some pallets built, I can attach the remaining forks at a width that will slide into the pallets.


Wednesday, November 21, 2012

Happy Thanksgiving

A kitchen remodel has my attention lately, so model railroading is on hold for a brief time.  I thought I would share some recent photos from a trip to Fremont, NE.  I am looking for ideas for a new layout, and needed some inspiration.  It's that time of year again, so Happy Thanksgiving and Safe Black Friday.

Here is a local crew switching out the ADM bean processing plant.


I spotted this train just south of town on the BNSF.  A nice pair of Canadian National units in the lead.


A project that has been on the back burner is my 64' reefer weathering.  I have about 18 BLMA reefers that are in various stages of graffiti now.  Here are a couple examples that I found to help be get motivated to pick that project back up.


A stack train going through town.


Here is a tank loading facility that I think would be fun to model.  


Saturday, November 17, 2012

N Scale Forklifts Nearing Completion

My forklift project is progressing nicely.  I painted the tires and wheels, and installed the roll cages on all of them.  I still need to add the operator at this point.  Since the kits come with extra parts, I decided to take an extra operator and see if I could cut the seat and steering wheel from the casting.  Using a sharp hobby knife I was able to make a separate seat and steering column without a lot of trouble.  You can see them in the nearest forklift in the photo below.  It looks more appropriate for a machine at rest, parked while not in use. The last steps will be adding the forks and then applying some weathering to make them look used.


Wednesday, November 14, 2012

GHQ Forklift Project is Progressing

I have made some progress on my half dozen GHQ forklift kits.  Although I painted them all yellow, I plan to make variations within the set so they aren't all the same.  I am seeing a lot of typical forklifts with a yellow body, black roll cage, black mast and forks, and different color rims.  I decided to do white rims on the first.

The kit comes with a seat, steering column, and operator all molded as one piece.  I don't mind having the static operator in a couple of the forklifts, but would also like at least a couple of them to have an empty seat so I can simply "park" them in an appropriate location next to a building for example.  I think I can make a seat easy enough, by using some styrene, painting it black, and fixing it to the body where the original seat would go.  However, I don't know what I could use for a steering column and steering wheel?


This one still needs an operator added.  I'll probably weather these a bit once they are done to give them a used appearance.  The yellow is UP Armor, the mast and roll cage are flat black, the tires are grimy black, and the rims are reefer white.


Saturday, November 10, 2012

N Scale GHQ Forklift Project

It's November, and as I was driving today, my thermometer read 80 degrees at midday.  It was crazy windy however.  Tomorrow the high is only 35, and it is raining as I type this.  Wild weather!

Anyway, I have had several N scale GHQ forklift kits waiting to be assembled and painted, and last night I finally got them out.  I have a total of six kits, but a couple are for a friend.  They are fairly easy to assemble since there aren't many pieces to each forklift.  Each kit comes with two masts so that the final model can have the forks in a lowered position or a raised position.  I chose to model 3 of each.  

Last night I spent some time cleaning up the metal parts and attaching the masts to the main body, which is one piece.  Tonight I airbrushed each of them with UP Armour Yellow Polly S acrylic.  

So far they are turning out nicely.  The detail is crisp, and the level of effort so far has been minimal.  


Friday, November 2, 2012

GO BIG RED!! Case IH on the UP


Since I am a fan of the Big Red, a fan of Case IH, and obviously a train addict, I was quite pleased to find a train loaded with Case IH combines headed eastbound near Fremont, Nebraska.

Nice looking train!  If only we had a suitable model in N scale.....